If you Google how to remove a color profile to prep for the web in either Lightroom or Photoshop you will get a ton of strings that will all suggest something different, often too technical for me.
Many people, like myself had files that were prepared with a specific color profile for printing such as in Adobe RGB or a custom profile, and when they tried removing it in Photoshop, even though it was saved, would not go away. It ended up making many of my files have a desaturated, green hue when uploaded to the web. That color profile needed to go away.
Based on what I was told, I would go, in Photoshop, to Edit/Assign Profile, Save for Web and always click the popup box that said “Do Not Color Manage”, all to no avail. Every time I saved the image that annoying popup box would indicate that there still was a color profile embedded in my image and my images still had that awful color on the web.
Aaaaargh. I must have gone through so many websites looking for the answer and so many attempts that I was near tears. My two cents to those tekkies out there who write in their blogs, “Just run the Remove.app” or “add these lines of code” something like that…I DON’T KNOW WHAT YOU MEAN or WHERE you mean!! Please break it down for us who don’t know or have the time to find out. Even Adobe’s website was no help.
Here’s How You Remove
a Color Profile in Lightroom
So after many cups of coffee one day, I had an A-HA moment all by msyelf! I’m sure that it’s somewhere in the loads of websites, but I just couldn’t find it. I went to Lightroom and looked everywhere and finally found the solution that worked.
So here’s my solution, and it’s easy:
- Open Lightroom
- Click the Import Button at the bottom or go to File/Import Photos and Video or press Ctrl+Shift+I
- Select your images.
- Once imported, select all the images.
- Click the Export Button at the bottom or go to File/Exportor press Ctrl+Shift+E
- A popup screen comes up and this is where you output the images for the web in sRGB, which is a standard web color.
- ***Here it is, here it is: In the 4th setting under File Settings choose JPEG and in the Color Space select the pulldown choice sRGB.
This totally did the trick. No longer did I get that annoying popup box. I’ve attached a screenshot of the Export box so that you can see what the setting has to be circled in red.
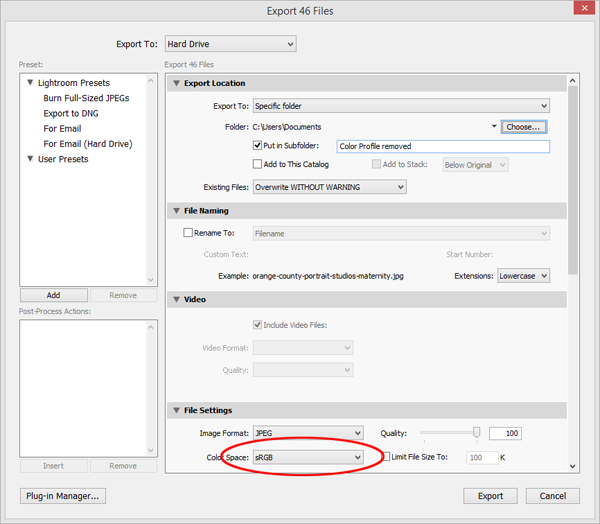
Here’s a screenshot of the Export popup in Lightroom and circled in red is the crucial setting.
Please share this with your photography friends and spread the love. If this helped, please comment below. This is worthy of a discussion and a brainstorm session.
